QEMU and KVM
QEMU is a generic machine emulator and virtualizer. QEMU provides the userspace components of the widely used KVM (Kernel-based Virtual Machine).
QEMU and zoned block devices
Host-managed SMR disks can be attached directly to a QEMU guest and used for running applications in a virtual machine environment. This is useful for software and kernel development and tests.
There are two supported methods for attaching host-managed SMR zoned disks to a QEMU guest: (1) virtio-scsi and (2) vhost-scsi. virtio-scsi is the simpler of the two methods. vhost-scsi is the faster of the two methods, but cannot be used without QEMU KVM acceleration.
QEMU also makes it possible to emulate NVMe devices that implement zoned namespaces.
QEMU virtio-scsi
This is the simplest method for attaching a zoned block device so that it can be accessed by a QEMU guest. Define a virtual PCI bus and SCSI host and then use the QEMU option virtio-scsi-pci.
QEMU Command Example
For example, the following command runs QEMU:
# qemu-kvm (your options) \
	-device pcie-root-port,bus=pcie.0,id=rp1 \
	-device virtio-scsi-pci,bus=pcie.0,id=scsi0 \
	-drive file=/dev/sdf,format=raw,if=none,id=zbc0 \
	-device scsi-block,bus=scsi0.0,drive=zbc0
Analysis of QEMU Command
The first line, -device pcie-root-port,bus=pcie.0,id=rp1, creates a PCIe root
complex.
The second line, -device virtio-scsi-pci,bus=pcie.0,id=scsi0,
defines a virtio adapter that connects to the previously-defined PCIe bus.
The last 2 lines, -drive file=/dev/sdf,format=raw,if=none,id=zbc0
and -device scsi-block,bus=scsi0.0,drive=zbc0, define the device that is
connected to the virtio SCSI adapter. In this example, -device scsi-block is
used, which means that the host device that will be attached is specified with
the device block device file (/dev/sdf).
See here for a detailed description of these options.
Sense data in QEMU prior to Version 4.1
Although this method makes it possible to attach a zoned block disk to a QEMU guest, SCSI command sense data is not processed correctly in older QEMU versions (this includes all QEMU versions prior to version 4.1). This causes the guest operating system to hang if the guest attempts to access command sense data (for example, after command failures). Because of older QEMU versions' inability to properly process SCSI command sense data, you should avoid this attachment method with versions of QEMU older than version 4.1.
The "sense data problem" can be avoided with QEMU versions prior to version
4.1 by attaching a zoned disk to a guest using the "device SG node file" as
a specifier. If you do this, you must use the option -device scsi-generic.
To do this, change the command on the command line in the following way:
# qemu-kvm (your options) \
	-device pcie-root-port,bus=pcie.0,id=rp1 \
	-device virtio-scsi-pci,bus=pcie.0,id=scsi0 \
	-drive file=/dev/sg5,format=raw,if=none,id=zbc0 \
	-device scsi-generic,bus=scsi0.0,drive=zbc0
On the host, the correspondance between a block device file and its SG node file
can be discovered using the lsscsi command.
# lsscsi -g
...
[10:0:1:0]   zbc     HGST     HSH721415AL42M0  a250  /dev/sdf   /dev/sg5
...
After the guest operating system has been started, attachment of the host
device can be checked with any of the methods shown in the SMR disk section of
the Getting Started Guide. For example, the
output of the lsscsi command will be as follows with the above example setup.
# lsscsi -g
[0:0:0:0]    disk    ATA      QEMU HARDDISK    2.5+  /dev/sda   /dev/sg0
[6:0:1:0]    zbc     HGST     HSH721415AL42M0  a250  /dev/sdb   /dev/sg1
QEMU vhost-scsi
This attachment method uses a fabric module in the host kernel to provide KVM guests with a fast virtio-based connection to SCSI LUNs. This method cannot be used without QEMU KVM acceleration.
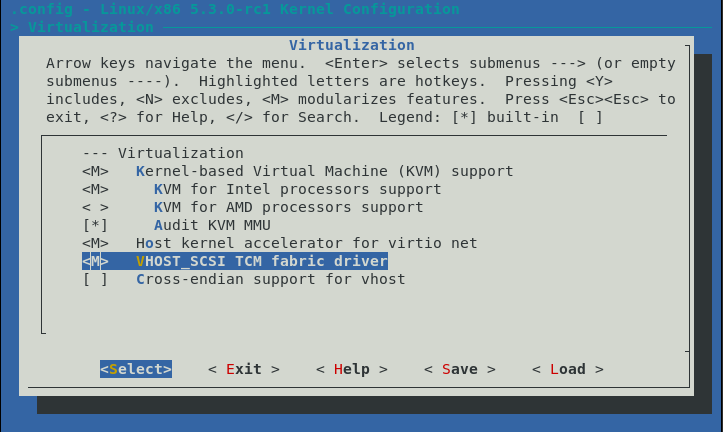
Enabling the host vhost target module
The host kernel configuration must have the CONFIG_VHOST_SCSI option enabled. This option is found in the top level Virtualization menu of the kernel configuration.
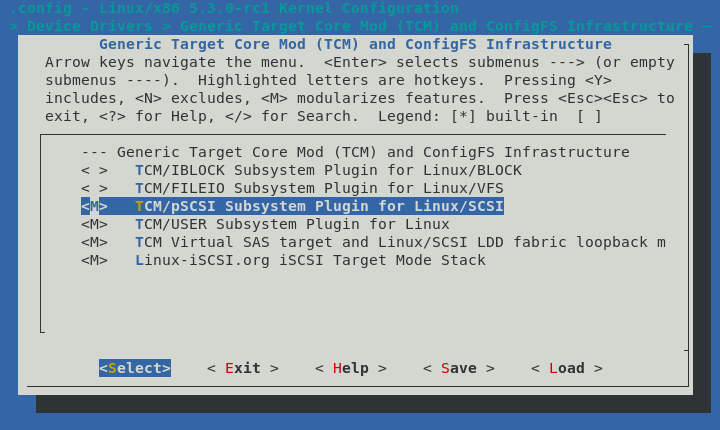
To make it possible to attach physical disks as well as tcmu-runner-emulated ZBC disks, you must enable the kernel configuration option CONFIG_TCM_PSCSI. This option can be found in the menu Device Drivers -> Generic Target Core Mod (TCM) and ConfigFS Infrastructure.
Attaching a host physical disk
To attach a zoned device to a virtual machine guest, you must first prepare a
virtual TCM SAS adapter, using the targetcli tool. Specify the device to
attach by using a block device file. The example below illustrates this
operation for the disk /dev/sdf:
-
Use the targetcli Tool to Create a Device
Use targetcli to create the device that you will attach.
# targetcli
targetcli shell version 2.1.fb49
Copyright 2011-2013 by Datera, Inc and others.
For help on commands, type 'help'.

/> cd backstores/pscsi
/backstores/pscsi> create name=disk1 dev=/dev/sdf
Note: block backstore recommended for SCSI block devices
Created pscsi storage object disk1 using /dev/sdf
/backstores/pscsi> cd /vhost
/vhost> create
Created target naa.5001405a160fe2e1.
Created TPG 1.
/vhost/naa.5001405a160fe2e1> cd /vhost/naa.5001405a160fe2e1/tpg1/luns
/vhost/naa.50...2e1/tpg1/luns> create /backstores/pscsi/disk1
Created LUN 0.
/vhost/naa.50...2e1/tpg1/luns> cd /
/> ls
o- / ..................................................................... [...]
  o- backstores .......................................................... [...]
  | o- block .............................................. [Storage Objects: 0]
  | o- fileio ............................................. [Storage Objects: 0]
  | o- pscsi .............................................. [Storage Objects: 1]
  | | o- disk1 ............................................ [/dev/sdf activated]
  | |   o- alua ............................................... [ALUA Groups: 0]
  | o- ramdisk ............................................ [Storage Objects: 0]
  | o- user:fbo ........................................... [Storage Objects: 0]
  | o- user:rbd ........................................... [Storage Objects: 0]
  | o- user:zbc ........................................... [Storage Objects: 0]
  o- iscsi ........................................................ [Targets: 0]
  o- loopback ..................................................... [Targets: 0]
  o- vhost ........................................................ [Targets: 1]
  o- naa.5001405a160fe2e1 ............................................ [TPGs: 1]
      o- tpg1 .............................. [naa.500140565cd16730, no-gen-acls]
        o- acls ...................................................... [ACLs: 0]
        o- luns ...................................................... [LUNs: 1]
          o- lun0 .............................. [pscsi/disk1 (/dev/sdf) (None)]
/> exit -
Use qemu-kvm to Attach the Device
The World-Wide port name assigned by targetcli can then be used to specify the device to attach, using a qemu-kvm command on the command line:
# qemu-kvm (your options) \
       -device pcie-root-port,bus=pcie.0,id=rp1 \
-device vhost-scsi-pci,wwpn=naa.5001405a160fe2e1,bus=pcie.0 -
Confirm that the disk is visible to the Virtual Machine Guest OS
List the attached disk from the guest OS by using the lsscsi command:
# lsscsi -g
[0:0:0:0]    disk    ATA      QEMU HARDDISK    2.5+  /dev/sda   /dev/sg0
[6:0:1:0]    zbc     HGST     HSH721415AL42M0  a250  /dev/sdb   /dev/sg1
Attaching an emulated ZBC disk
tcmu-runner can be used to create emulated ZBC host-managed SCSI disks. The emulated disk that is created can be used locally on the host using the loopback fabric adapter, as explained in the "Creating an Emulated Disk" section of the tcmu-runner page.
The emulated ZBC disk can be attached to a vhost virtual adapter for use within a KVM guest operating system. This is done in a manner similar to the manner in which a physical device is attached. (See "Attaching a Host Physical Disk" for the particulars of attaching a physical device).
The following example illustrates this procedure, creating a small 20GB host-managed SCSI disk with 256 MB zones including 10 conventional zones:
-
Use targetcli to Create a 20GB Host-managed SCSI Disk
Run the following command to create a 20GB host-managed SCSI disk with 256 MB zones (including 10 conventional zones):
# targetcli
targetcli shell version 2.1.fb49
Copyright 2011-2013 by Datera, Inc and others.
For help on commands, type 'help'.

/> cd /backstores/user:zbc
/backstores/user:zbc> create name=zbc0 size=20G cfgstring=model-HM/zsize-256/conv-10@/var/local/zbc0.raw
Created user-backed storage object zbc0 size 21474836480.
/backstores/user:zbc> cd /vhost
/vhost> create
Created target naa.5001405a0776dce3.
Created TPG 1.
/vhost> /vhost/naa.5001405a0776dce3/tpg1/luns create /backstores/user:zbc/zbc0
Created LUN 0.
/vhost> cd /
/> ls
o- / ..................................................................... [...]
  o- backstores .......................................................... [...]
  | o- block .............................................. [Storage Objects: 0]
  | o- fileio ............................................. [Storage Objects: 0]
  | o- pscsi .............................................. [Storage Objects: 0]
  | o- ramdisk ............................................ [Storage Objects: 0]
  | o- user:fbo ........................................... [Storage Objects: 0]
  | o- user:rbd ........................................... [Storage Objects: 0]
  | o- user:zbc ........................................... [Storage Objects: 1]
  | o- zbc0 [model-HM/zsize-256/conv-10@/var/local/zbc0.raw (20.0GiB) activated]
  |     o- alua ............................................... [ALUA Groups: 1]
  |       o- default_tg_pt_gp ................... [ALUA state: Active/optimized]
  o- iscsi ........................................................ [Targets: 0]
  o- loopback ..................................................... [Targets: 0]
  o- v  host ...................................................... [Targets: 1]
  o- naa.5001405a0776dce3 ............................................ [TPGs: 1]
     o- tpg1 ............................... [naa.500140533e375d94, no-gen-acls]
        o- acls ...................................................... [ACLs: 0]
        o- luns ...................................................... [LUNs: 1]
          o- lun0 ............................... [user/zbc0 (default_tg_pt_gp)]
/> exit -
Start the Virtual Machine with qemu-kvm
Start the virtual machine with the emulated ZBC disk attached by using the World-Wide port name that was assigned by targetcli:
# qemu-kvm (your options) \
       -device pcie-root-port,bus=pcie.0,id=rp1 \
-device vhost-scsi-pci,wwpn=naa.5001405a0776dce3,bus=pcie.0 -
Confirm That the Disk is Visible to the Virtual Machine Guest OS
List the disk on the command line of the guest by using lsscsi:
# lsscsi -g
[0:0:0:0]    disk    ATA      QEMU HARDDISK    2.5+  /dev/sda   /dev/sg0
[6:0:1:0]    zbc     LIO-ORG  TCMU ZBC device  0002  /dev/sdb   /dev/sg1
QEMU NVMe ZNS Device emulation
This article describes in detail how QEMU can be configured to create an emulated NVMe ZNS namespace that is visible to the guest operating system. Example commands and an example shell script are provided as references.