Zonar for Zoned Filesystems
Overview
Zonar is a graphical user-interface (GUI) application that allows users to monitor and visualise a zoned filesystem. It provides real-time visualisation of a zoned filesystem's blockgroups. Zonar supports zoned filesystems on both regular and zoned block devices. Currently only XFS is supported by Zonar.
Zonar is publicly available on GitHub. The project README file provides information on how to compile and install Zonar.
Supported Filesystems and Devices
Zonar currently only supports XFS. Zonar supports monitoring XFS filesystems on both zoned and conventional devices (Zoned XFS).
Starting Zonar
Once Zonar has been compiled and installed, you can start it with
$ sudo zonar <path-to-zoned-filesystem>

zonar, version 1.0.0
Copyright 2026 (C) Western Digital Corporation or its affiliates.

Mount directory /mnt/zbd: XFS on device /dev/zloop0
  Vendor ID: Unknown
  Capacity: 30000 GB (58594426880 512-bytes sectors)
  Logical block size: 4096 B
  Physical block size: 4096 B
  111760 zones of 256 MiB (524288 512-bytes sectors)
  Max open zones: 128
  Max active zones: 0
The example above uses a zloop device to demonstrate Zonar.
The Graphical Interface
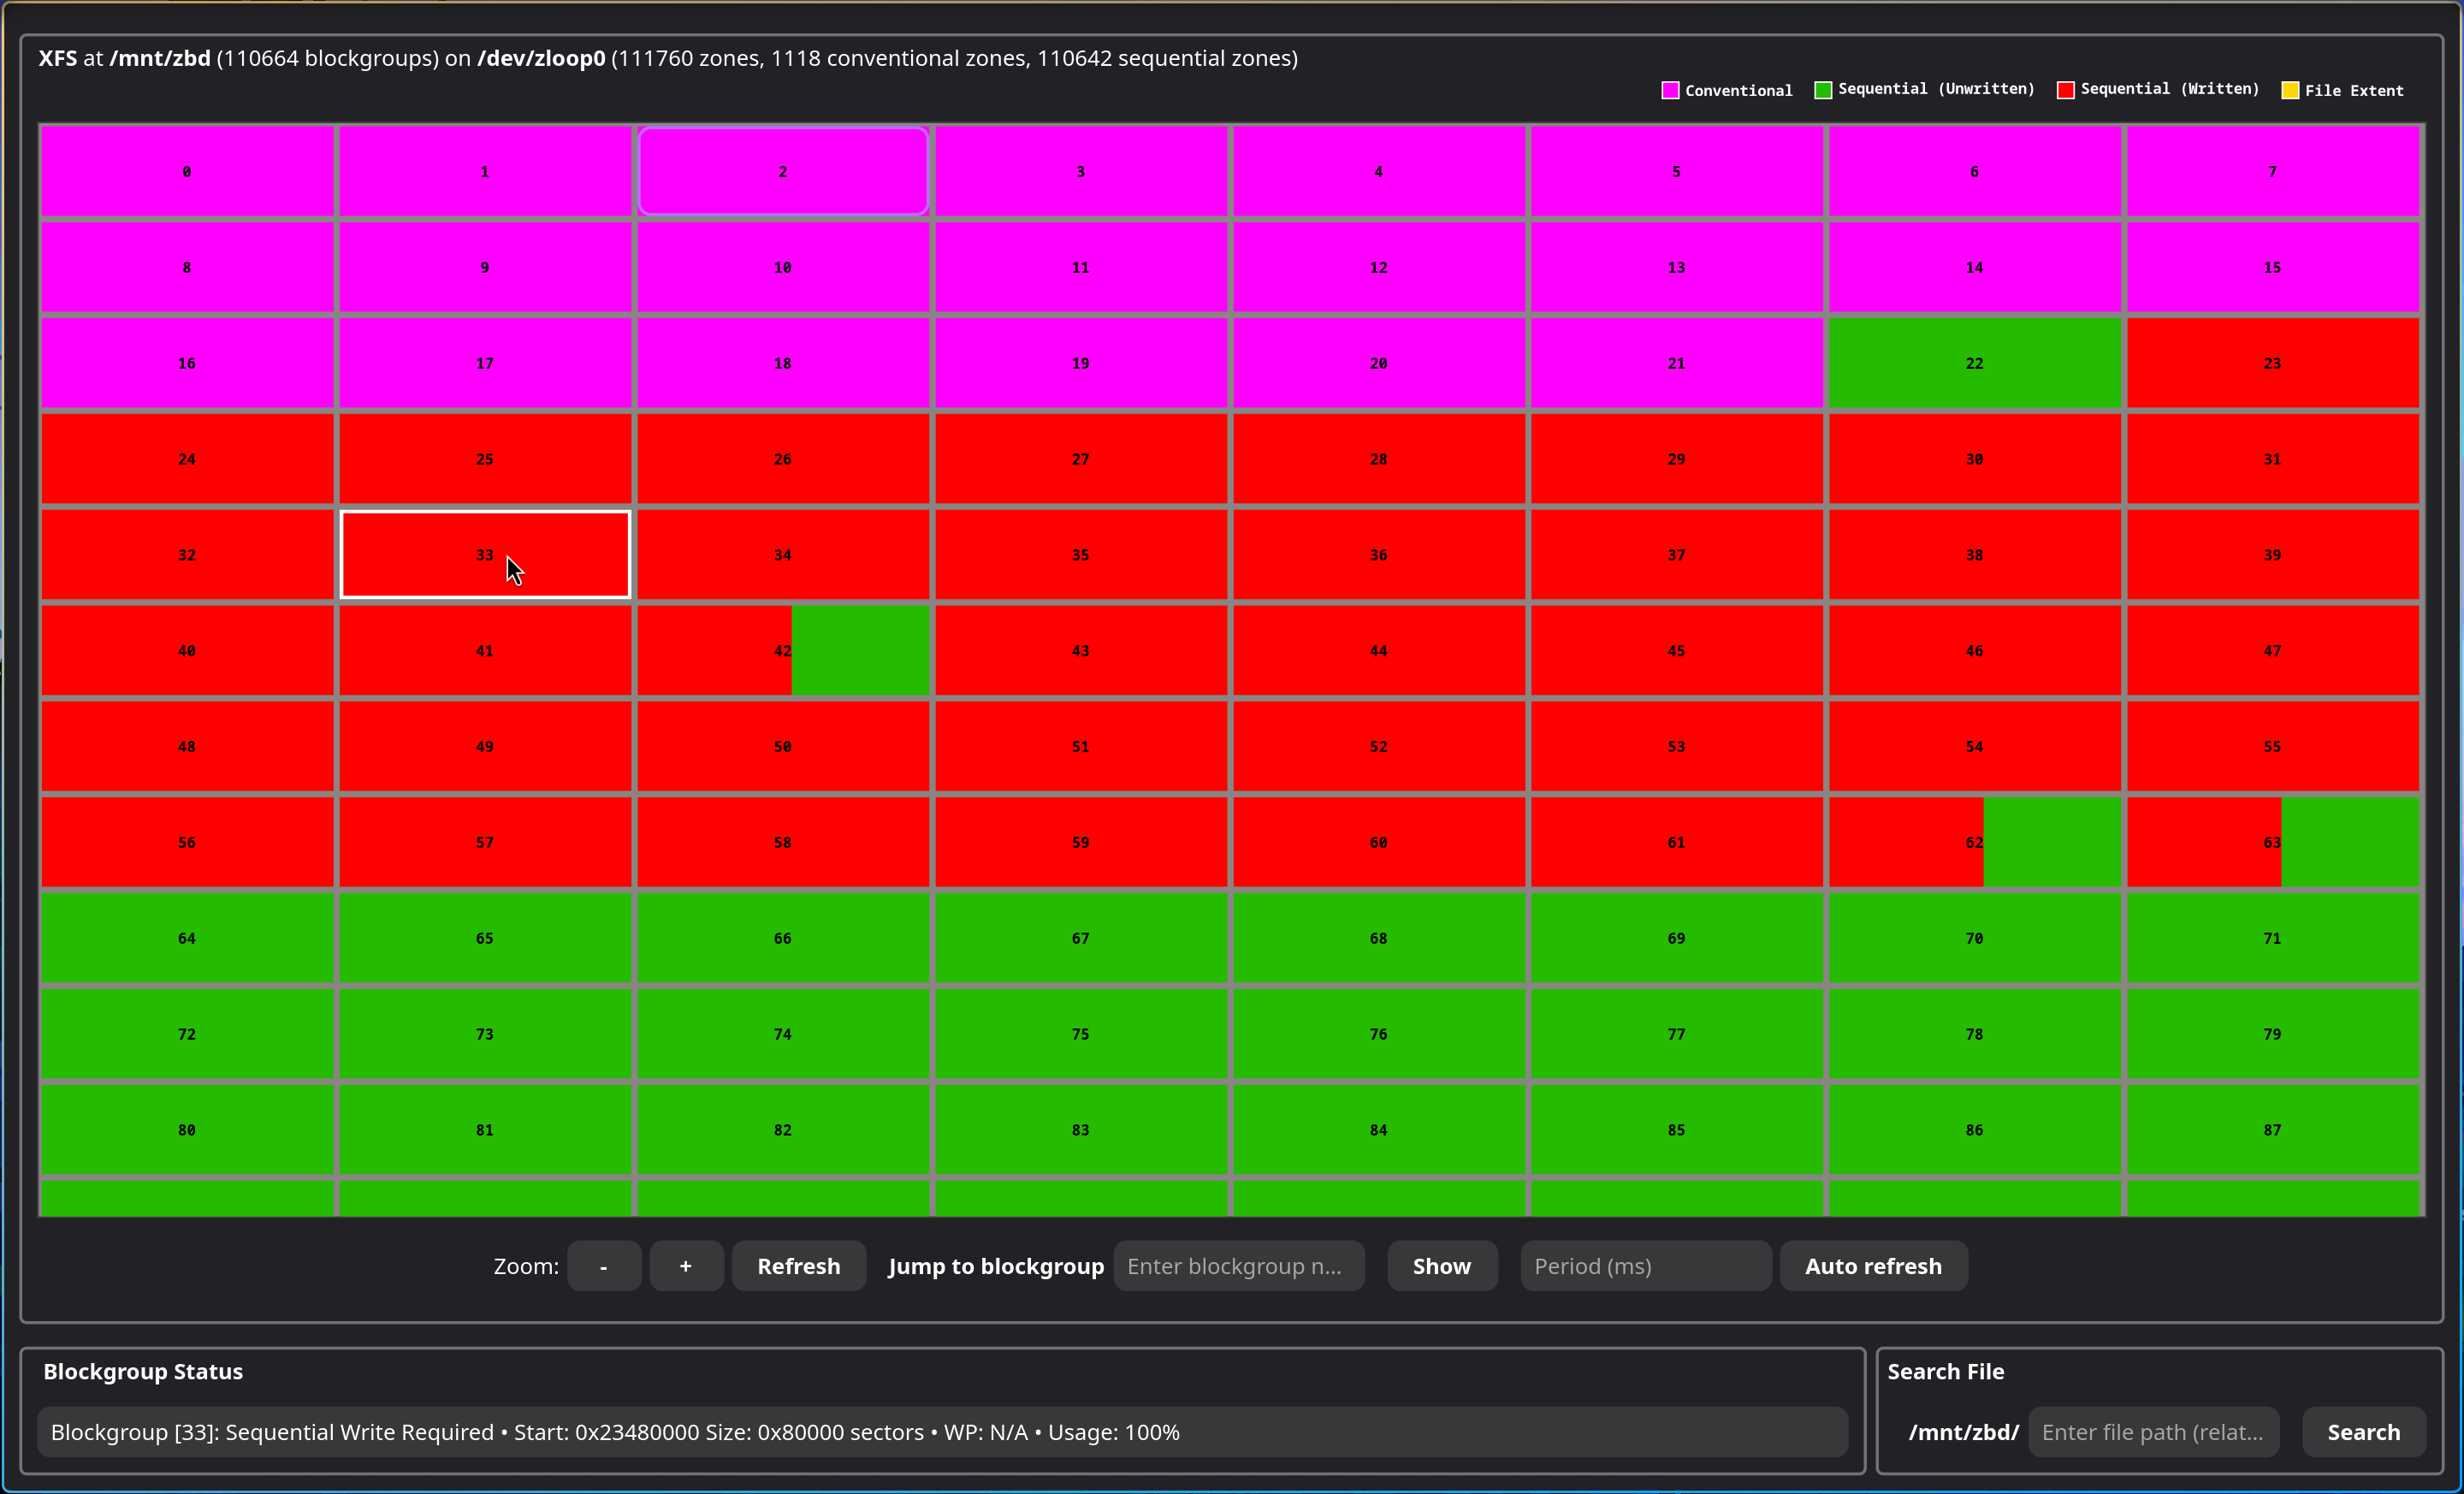
The image above demonstrates Zonar examining an XFS filesystem on a zloop device. The UI presents itself in 3 key components:
- Filesystem information and the legend.
- A scrollable grid window which shows the filesystem blockgroups.
- Interactive features for users.
1. Filesystem Information
As per the screenshot above, at the very top Zonar shows the filesystem type (XFS), the mount location (/dev/zloop0) and the total number of zones (sequential and conventional). The legend for the scrollable blockgroup grid is also displayed here.
2. Scrollable blockgroup grid
The scrollable blockgroup grid draws all of the blockgroups of the filesystem, and represents the blockgroups as sequential and conventional blockgroups. Sequential blockgroups use sequential write required zones, and conventional blockgroups use conventional zones for the underlying storage.
Users can click on the blockgroups to learn more about a particular blockgroup.
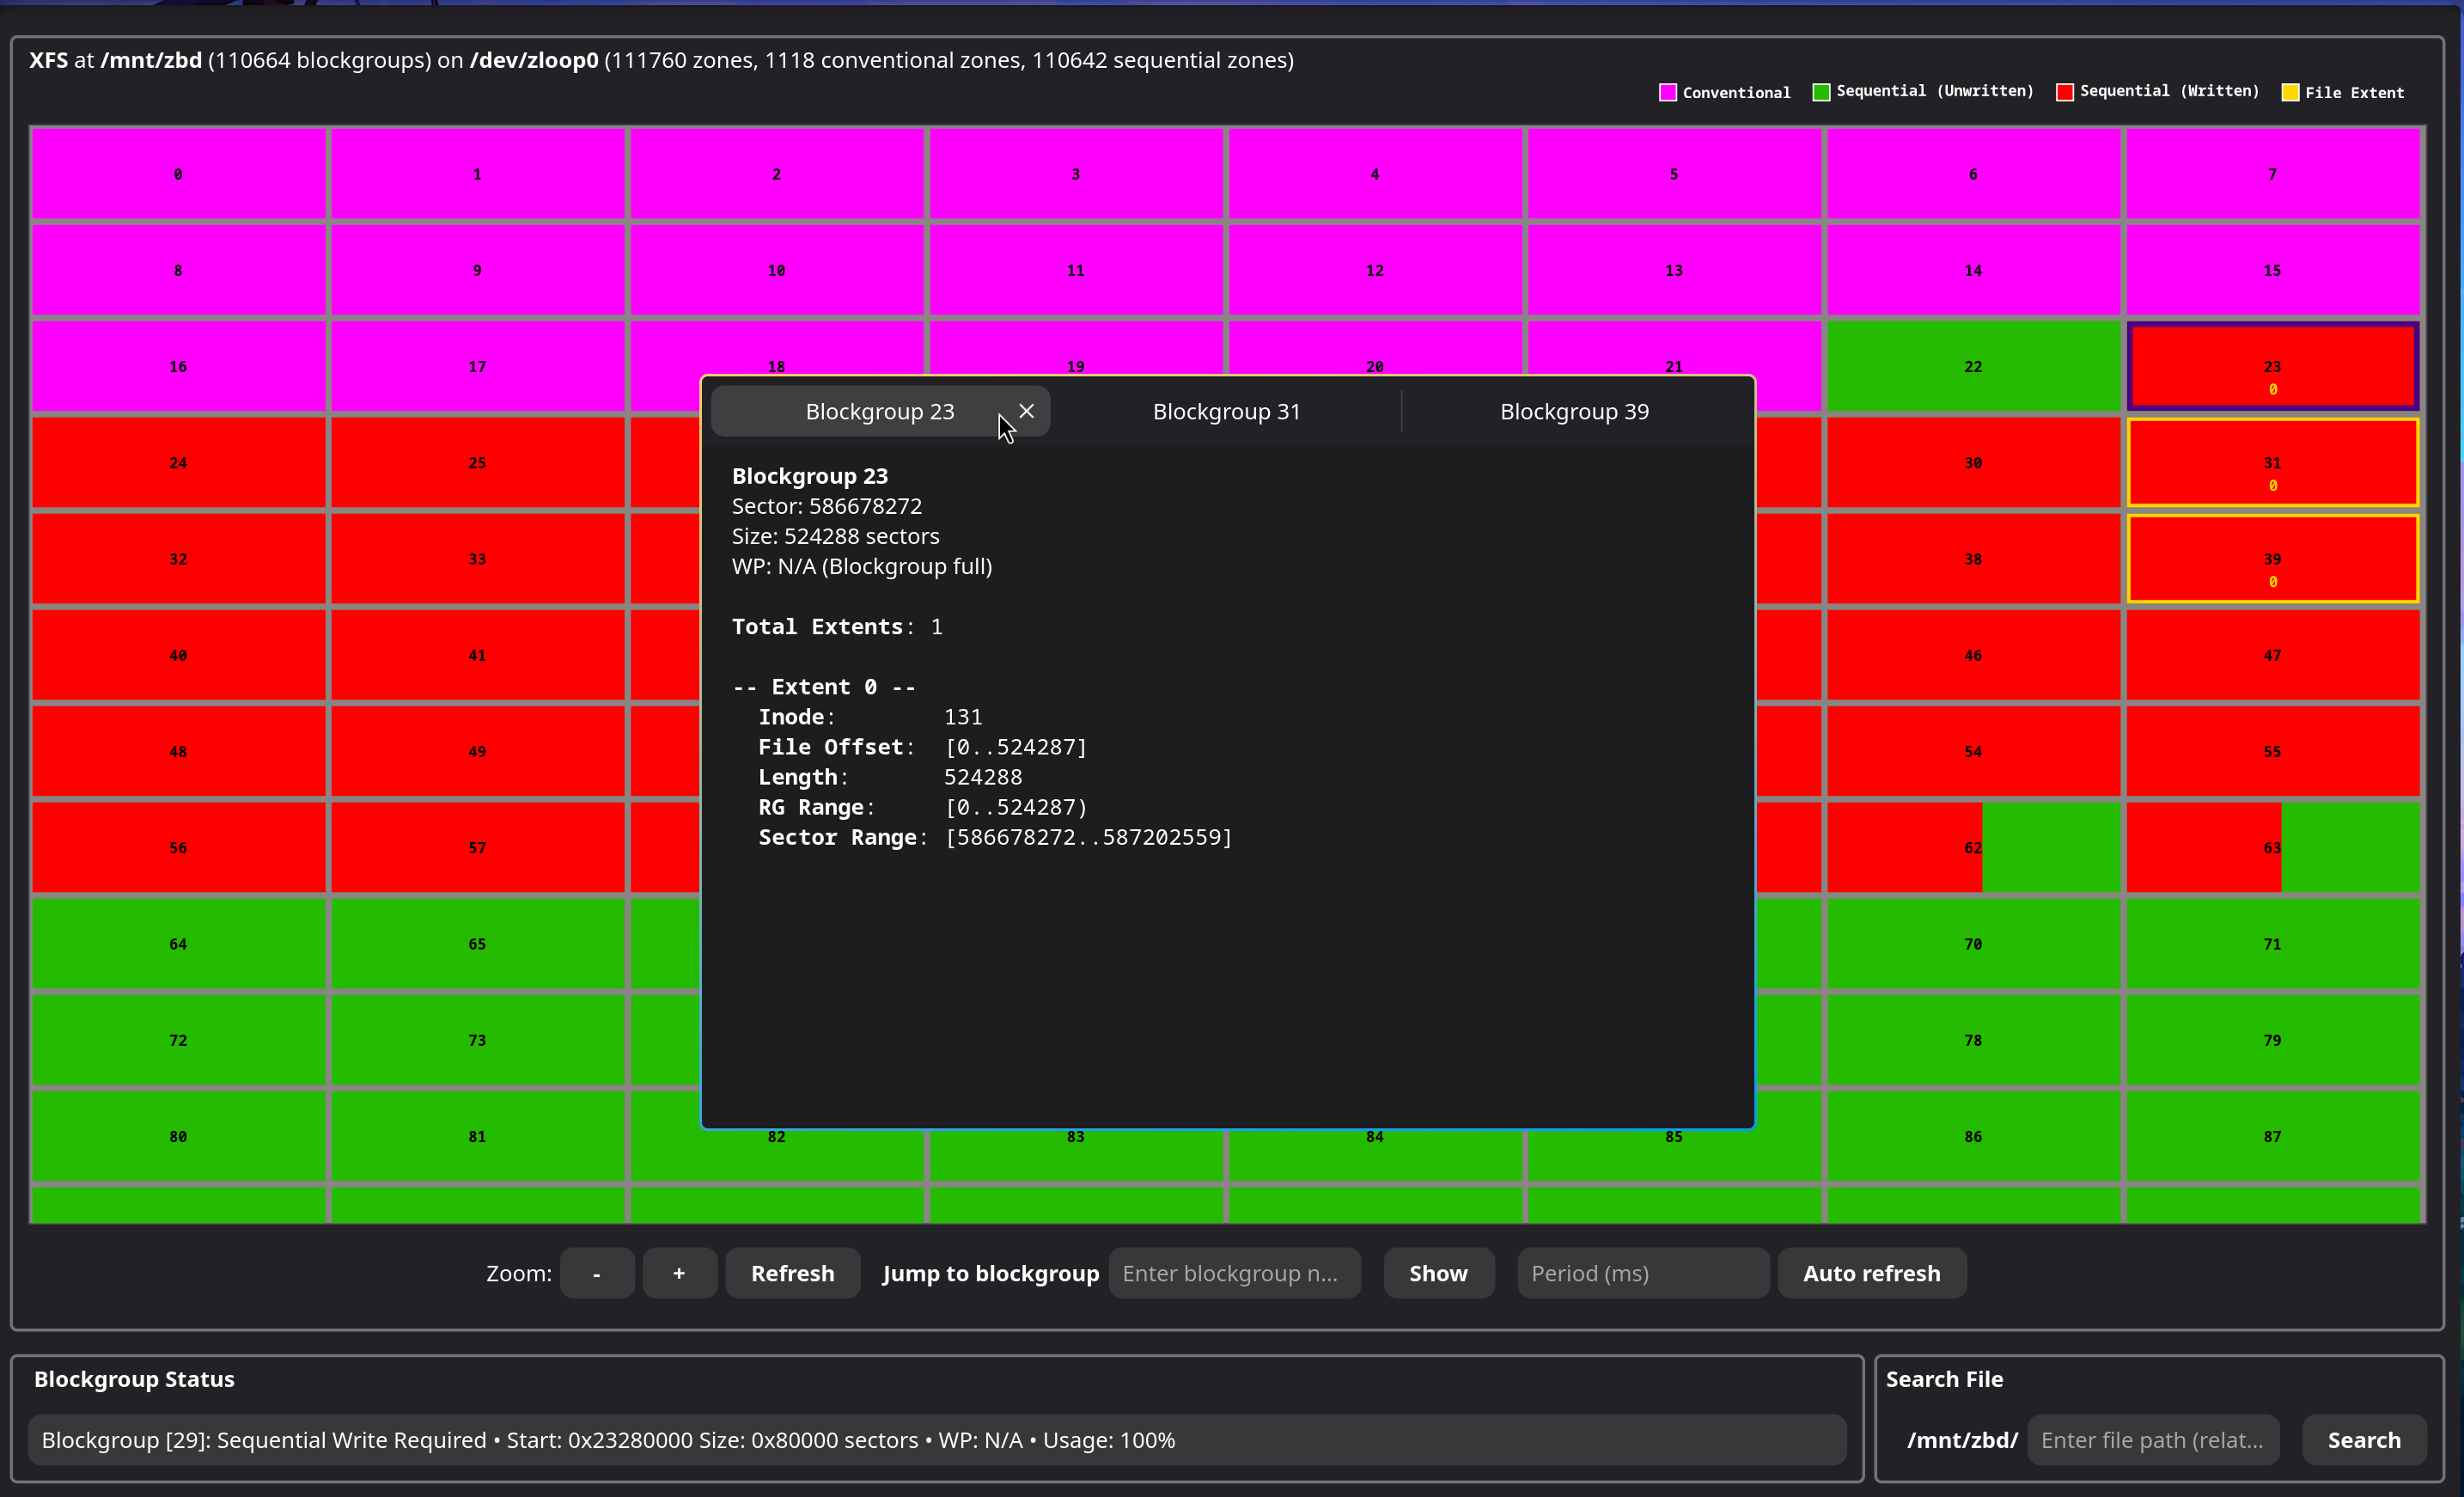
A tab displays information about the blockgroup, if the blockgroup contains extents of files, this information is also displayed here.
In the figure above, the user has clicked on blockgroups 23, 31 and 39. For blockgroups with tabs open, the respective blockgroups in the grid are outlined with yellow. For the tab in context, the respective blockgroup is outlined in purple.
3. Interactive features
Zonar offers additional features for users to interact with the GUI and the filesystem.
- Blockgroup resize (Zoom in/out)
- Jump to blockgroup
- Auto refresh
- Blockgroup status bar
- File extent search
Blockgroup Resize
Using the Zoom "+/-" buttons, blockgroups can be resized. It can be useful to zoom into a blockgroup with, for example, fragmented file extents, or to zoom out to create a larger field of view for all of the blockgroups.
Jump to blockgroup
Given a blockgroup number, this will automatically scroll the grid to the location of the respective blockgroup.
Auto Refresh
Given a refresh period (ms), when enabled, all of the blockgroups in view are periodically updated. That is, when data is being written to the filesystem, users are able to see this reflected in real-time as the blockgroup write pointer increments.
Upon every refresh, all open tabs are closed. Thus, this feature shall be disabled before opening tabs or a sufficiently large refresh period should be used.
Blockgroup status bar
Provides an at-a-glance look into the blockgroup the cursor is currently hovering over without needing to open tabs, such as the blockgroup type, start sector, size, write pointer, and the capacity usage.
File extent search
The file extent search allows users to search up a file by path relative to the root of the filesystem. Given a valid path, the extents of the file will be rendered on the grid on the respective blockgroups.
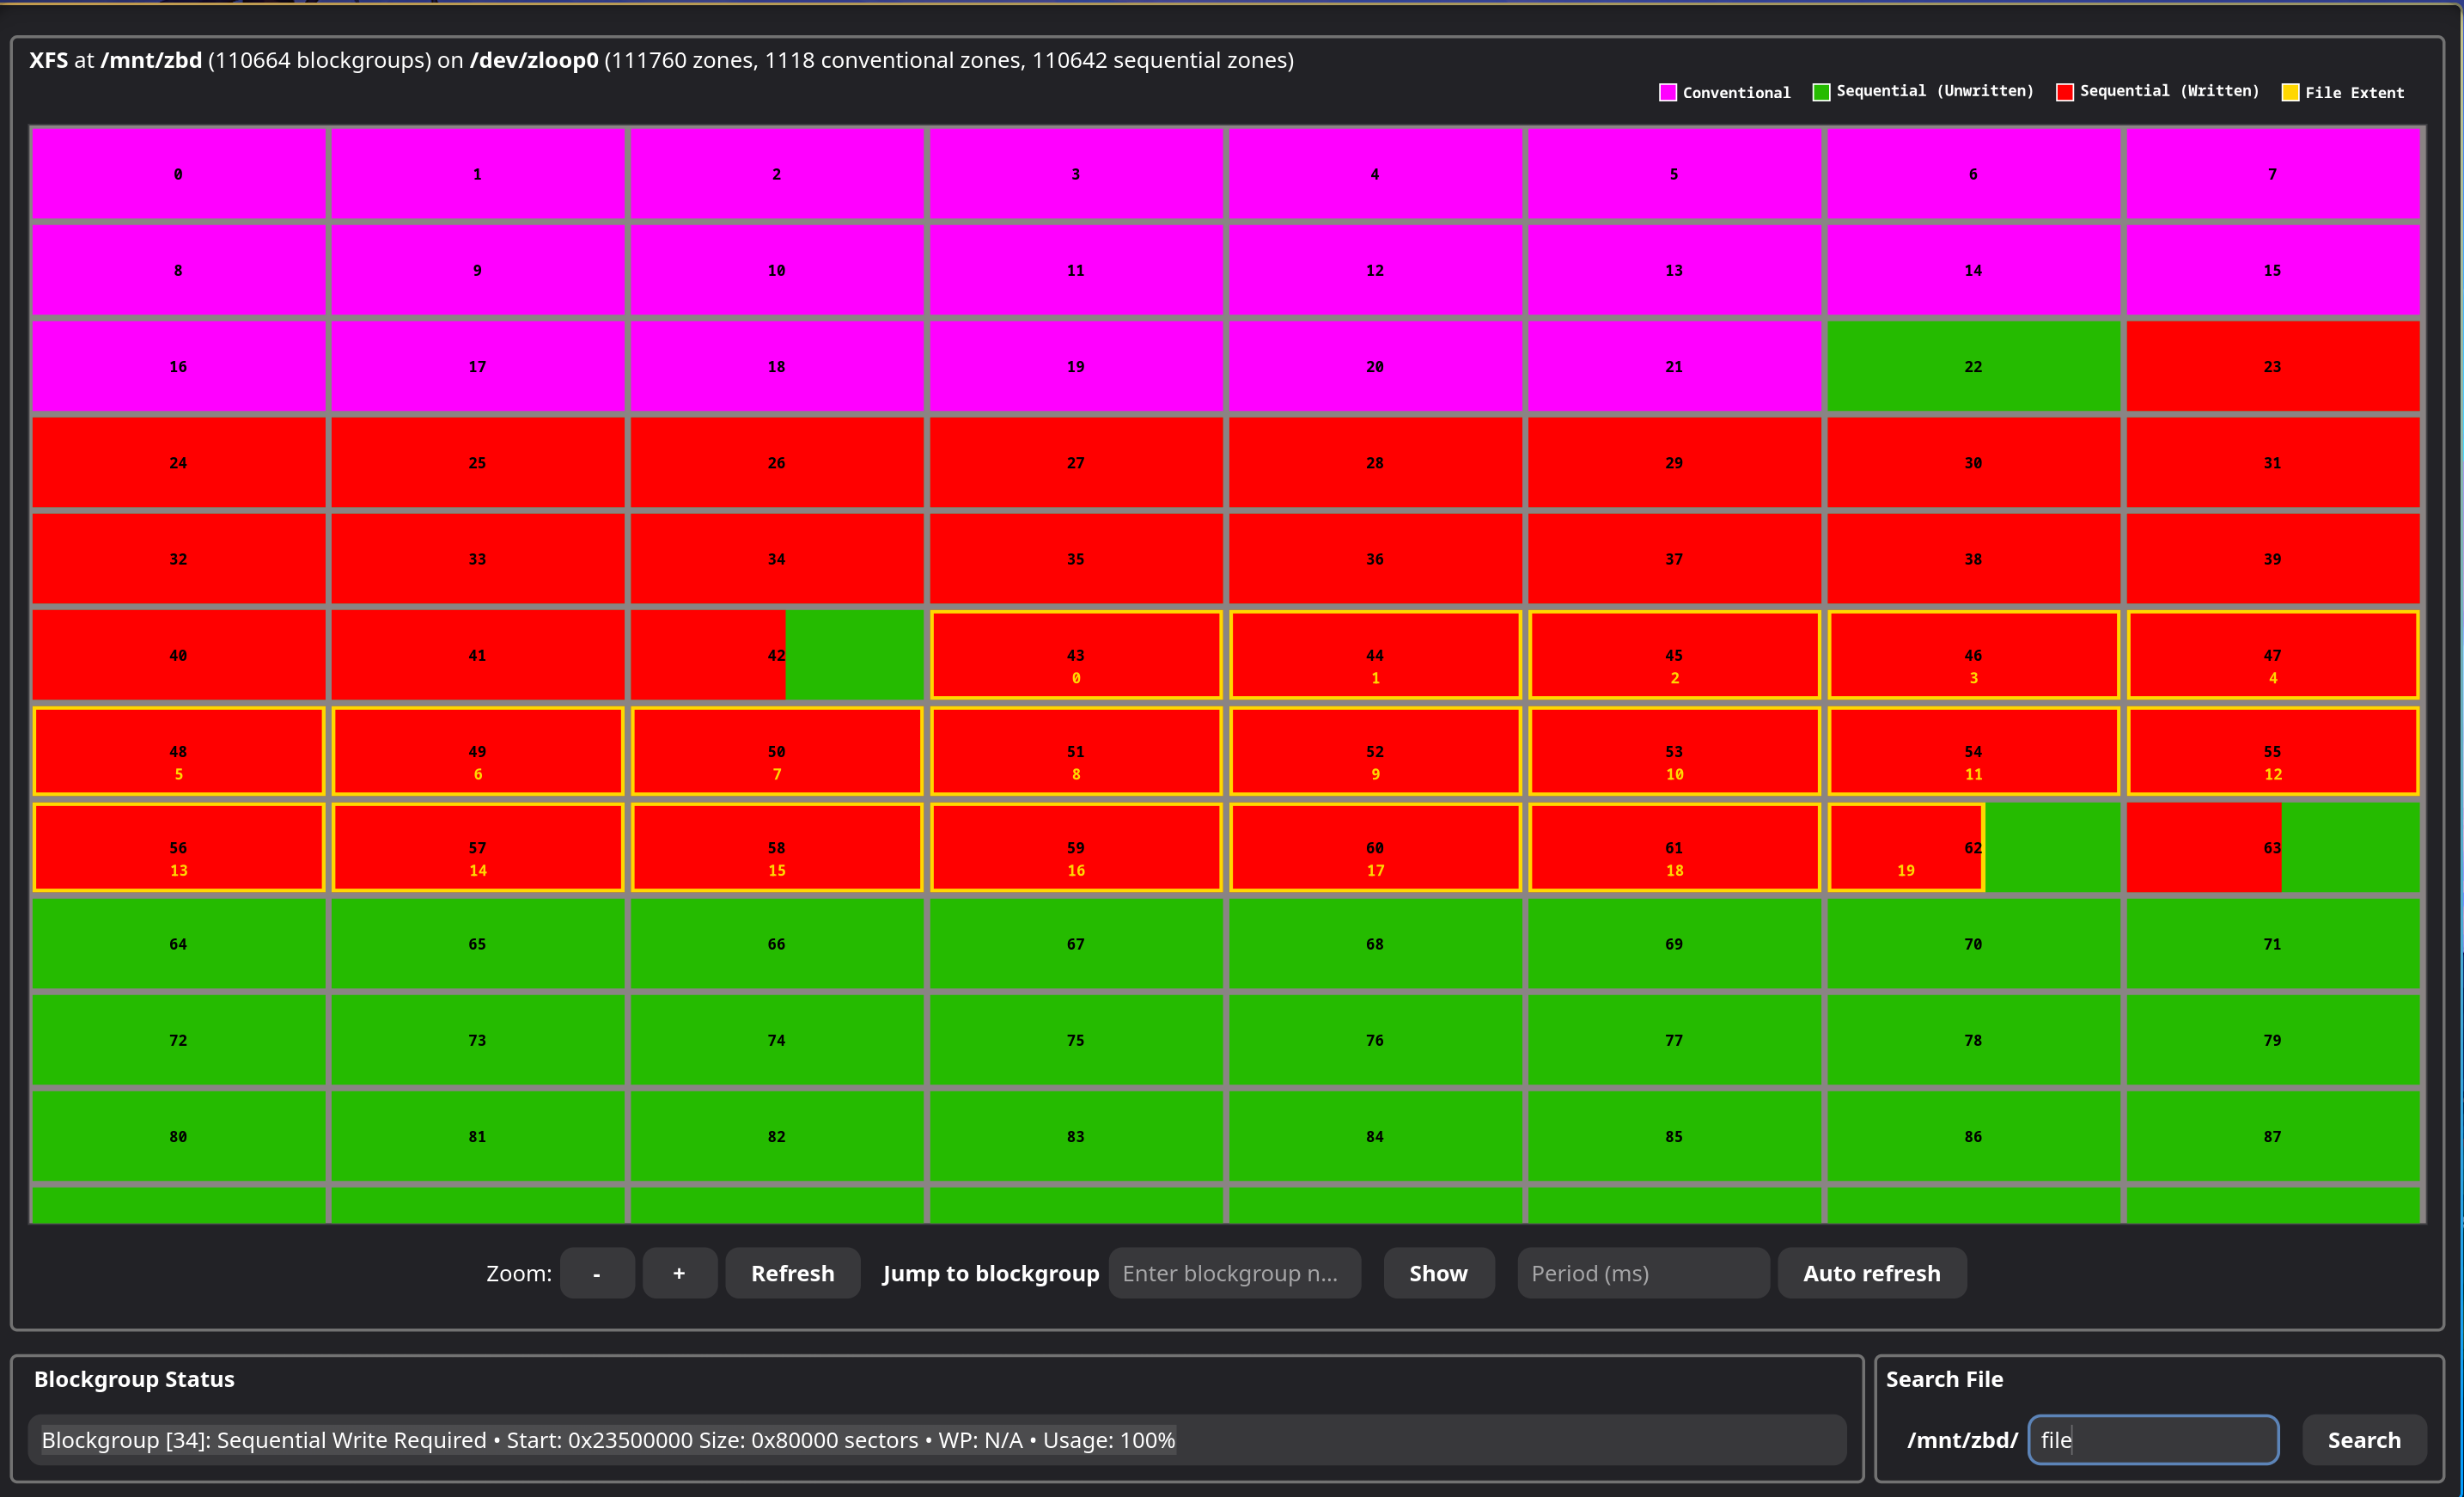
In the example above, the extents of "file" are in blockgroups 42 to 62 inclusive. Additional information about the individual extents are shown in the extents tab that is opened upon search.
Zonar Networking
Zonar is composed of two components, the GUI and the filesystem backend, which means Zonar supports doing filesystem monitoring remotely. For example, a user can run the Zonar server on a remote machine, and the GUI locally. This is particularly useful for systems where a machine may be headless and/or does not support the dependencies required by the GUI.
The following steps can be used to get started with Zonar in this server/client configuration. First, build Zonar on the remote machine; this example builds without the GUI.
$ ./configure --disable-gui
$ make
Start the Zonar server with
$ sudo ./src/zonar_srv </mnt/dir>

zonar (server), version 1.0.0
Copyright 2026 (C) Western Digital Corporation or its affiliates.

Mount directory /mnt/zbd: XFS on device /dev/zloop0
  Vendor ID: Unknown
  Capacity: 30000 GB (58594426880 512-bytes sectors)
  Logical block size: 4096 B
  Physical block size: 4096 B
  111760 zones of 256 MiB (524288 512-bytes sectors)
  Max open zones: 128
  Max active zones: 0
Listening for connections on port 49152...
Now on another machine, where the GUI is intended to run, you can build Zonar as per usual and run it with
$ ./src/zonar -v -c <target_ip>

zonar, version 1.0.0
Copyright 2026 (C) Western Digital Corporation or its affiliates.

Connecting to <target_ip:port>...
Mount directory /mnt/zbd: XFS on device /dev/zloop0
  Vendor ID: Unknown
  Capacity: 30000 GB (58594426880 512-bytes sectors)
  Logical block size: 4096 B
  Physical block size: 4096 B
  111760 zones of 256 MiB (524288 512-bytes sectors)
  Max open zones: 128
  Max active zones: 0
For cases where the remote server running the file system to inspect does not have a routable IP address (e.g. a class C address), the reverse connection mode can be used. With this, the local Zonar GUI client waits for the remote Zonar server to connect to it.
On the local machine, first start Zonar GUI client in listen mode:
$ zonar --listen
On the remote server owning the file system, the connection can be initiated:
$ sudo zonar_srv --connect x.y.z.c </mnt/dir>
Zonar Demonstration
The video demonstrates Zonar in action. Zonar is first started in network mode using localhost. Once the GUI is opened, blockgroups are examined for additional details, followed by searching for a file by name to show its extents. Lastly, auto-refresh mode is enabled to observe a file being written onto the filesystem which can be seen in real-time as the write pointer is incremented within the respective blockgroups. The demonstration ends by observing the extents of the newly written file.